Monday 9 February 2009

Map Detail

I started to draw up some of the map's detail onto the boards. For this I've started on the south west of the continent, mainly because this is the area that I have planned out the most in my head due to my writing.

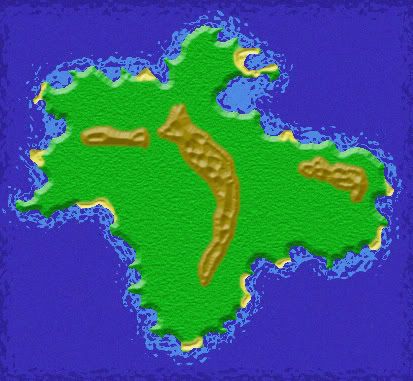
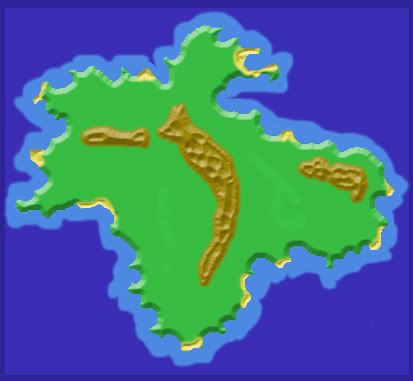
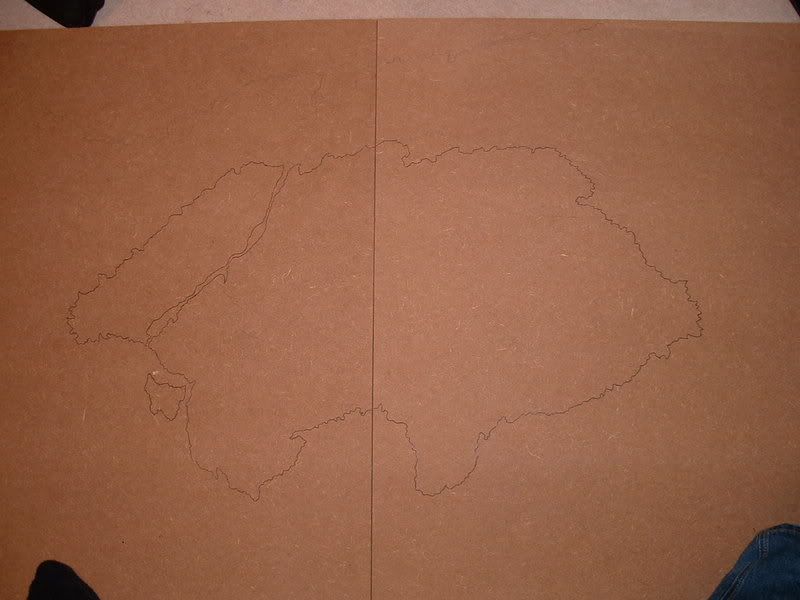
This area will feature at least two provinces of the Vancadian Empire. One of the two area's will be situated on the break away island to the left of the picture and the other will be the land between the coast and mountains located above the island .

Ok blogger dosent seem to be shrinking pictures at the moment and the picture is quite large. So I shall just post the link here.

http://i15.photobucket.com/albums/a377/Tiras_Vancano/Ilicia/MapDetail.jpg

I am in the process, along with the many other projects and pieces of work I have to do, of designing and creating a website for myself. It is my hope that on there I will be able to have a section dedicated to the lore of Ilicia. In this section I will be putting up an interactive map (most likly done in flash). My thoughts are that the map will start out on the whole world and people can click on various locations which will zoom the map in, each location will have more information about itself as well as more places to zoom in on.

The idea is that as I keep developing this world there will be more and more added to this interactive map. This is essentially where this blog is aiming to take me. Which means as I move from having drawn up and digitised the map the blog will be moving into things such as looking at hope to populate your world. The creation of lore and pivital stories. As well as taking a look from the business side of developing what is a new Intellectual Propperty.

Fun times are ahead

Digitising Maps 2

The second installment in the digitising maps part of this project.

I've added a few textures and effects to the map from the origional. However I am not too sure I am happy with the results, I think it still looks a little lacking. As such I think I will be looking for other techniques for creating cool looking maps in photoshop.

Anyways here is what I have at the moment:


Any tips, advice or comments would be greatly apprechiated =D

Note: I havent done anything to the beaches or mountains. I added a texture to the land to try and give it a feel of grass and I then added an effect to the sea (after sliming down the thickness of the ligher water) to make it ripply.

Friday 6 February 2009

Absense

Greetings all,

I hope you have had a brilliant week so far. Mine has been great, England has had some amazing snow over this past week. The most snow we have seen in 18-20 years, depending on which newspaper you read. So I have been out playing in the snow.

Anyways, I'm just posting up to say I havent forgotten about this blog. It will be continuing. The reason for my 4 month vanishing act is that I have been rather busy. I started my English Degree in September and that has been keeping me occupied so I havent been able to do any more to my map.

However there is some good news. During the past four months I have been working on my photoshop skills and so I feel I am alot better than I was before, as such I'm hoping I will be able to get some really nice results from the digitizing of my maps. Also my understanding of flash has vastly increased. I am hoping to get a website up and running at some point which will have quite a few resourses as well as various bits and bobs relating to what I do.

Unfortunatly, all of this will have to wait for the moment as I get on top of my University work and try to earn some money to pay off University debts. Hopefully I will be able to write up something about that in my writers blog soon, watch this space.

I had better get off as I have 10 poems due in Friday, so technically today, at 4pm. So far I have 1 finished poem and 4 nearly finished. Just another 5 to write...

Keep safe and have fun!

Wednesday 15 October 2008

Digitising Maps


Greetings all.

I hope you are having a great time doing what ever it is you do. I'd like to welcome you all to the next article in my blog on creating original worlds.

I haven't posted anything in a week or two mainly due to the fact that I didn't have any tracing paper to copy the map from the boards. However, I have finally bought some grease proof paper, so I am able scan the map into the computer. Once I have scanned the map into the computer I aim to change the line art into full colour maps.

So to do this I thought I would first learn how to create effective looking maps in photoshop. I will update this article as I improve the map more. The image on the left is is what I have so far.

I am rather happy with how the map looks at the moment, thought it has ALONG way to go before it will be in any shape that I would call finished.


Wednesday 24 September 2008

Masking

Using very thick wooden boards as the basis for my map proved one major problem for me. When it came to transferring the map I had drawn on the eight pieces of A4 to the board I realised that I would be unable to trace the map onto the board. Yes this may seem like an obvious thing to most but it wasnt until I actually came to this step that I realised the issue.

However, not to worry for I came up with a cunning plan. As always, a cunning plan arises at the time of peril, or something like that. Anyways, the plan I concieved was to trace the map onto some new pieces of A4 (so to preserve the origionals) and then cut the copies out and use them as templates.


It's not all that easy to see from the first picture but I have overlayed some of the templates over the original map. After I had done a mask for each piece of paper I then removed the origional maps and layed the masks out next to eachother.


Once happy that the masks were in the right position I began to draw around the masks using the wavy line technique - as descriped in 'Drawing Land'.


The final result can be seen in the picture below.


Also note from this picture that it is possible to see along the top the pencil markings I have put in for the start of the north polar land mass. As you can see many different types of land shapes can be created using this technique. However, it is also possible to simply draw the continents on free hand, though it may take more rubbing out on the final piece.


HUGE Map Project Articles

1.
Starting the Map
2.
Creating Continents
3.
Outlining the Continent
4. Masking

Tuesday 23 September 2008

Tutorial: Drawing Land

Welcome to the first Tutorial on creating map's for fantasy worlds. The aim of this series of tutorials is to provide you with basic tips on how to draw various elements for your maps. I may at some point venture into writing some other articles upon creating the ideas for the world. Though thinking upon it there are quite a lot of articles out there already which do a brilliant job of this so I think I will just link to them. This first tutorial will focus on drawing Land or rather Islands.

Genesis 1:6 states "Let the water under the sky be gathered to one place, and let dry ground appear." (NIV)

Just as our real world requires dry land for us to live upon so too do our fantasy worlds. Though granted it is not always the case that a fictional world requires land to be an enticing place for one's mind to wander - think Waterworld, now that's a cool film. However, for the majority land is a major component of any fictional world.

Now generally for myself when I come to drawing a body of land I use a very simple technique. I simply take my pencil and begin to draw wavy lines along its page. By allowing the pencil to flow it is quite easy to get a nice rugged edge to your land. This rugged line gives a fairly natural looking coast line and you can get some rather cool looking coasts by using this technique.

Ok so being able to draw a wavy line is all well and good but islands are comprised of more than just 1 coast line. This is where some people will perhaps prefer to do things different ways.

If you prefer then one way of getting a good island shape is to draw the rough shape of the island you want using a straight line. Then once you have your straight line simply trace over it using a wavy line. The diagram to the right shows an example of this technique.

Infact it's also a good way of drawing wavy letters. Just draw the letters you want in bubble writing with a straight line, then trace over them with the wavy line.

I really like the look and feel of the island I have drawn here - Infact I am tempted to use it in the World Map Project I am doing at the moment.

However, when I come to drawing my islands generally I do it free hand. So I simply take my pencil and draw away, seeing where the lines will take my island. Granted this does mean sometimes the islands do look a little naff, but all that is required is a rubber and a redrawing of the line.

I hope this tutorial helps. It's a very simply technique, but one I find works a treat.

Try it yourself sometime and let me know how it goes.

Outlining the Continent

The next stage for creating the continent I am designing is to continue the outline from the first piece of A4. To do this I placed a sheet of A4 on the Northern boarder and another piece of A4 on the Eastern boarder to look something like this.

On these two pieces of paper I continued the lines from the first map. These lines then run off to another edge of the paper they are on.

If you continue this until you are happy with the size of your continent then simply bring the lines together at the end to close off the land mass.

For me this meant using 8 pieces of A4 paper. I gauged the size I wanted my continent to be by laying the paper out on the 6'x4' board that will be used to draw the map on.


The final shape of this continent can be seen in the picture below, however I am unsure how clear the lines will be, but not to worry as the next stage in the development of the map is to transfer the map on the paper to the board itself.

Next Stage

HUGE Map Project Articles

1. Starting the Map
2. Creating Continents
3. Outlining the Continent